If you are moving your website to Sitewig, the database has to come too. The easiest way is to take an SQL file (a "dump") from your old provider and load it into an empty database at Sitewig. It typically takes 5–15 minutes.
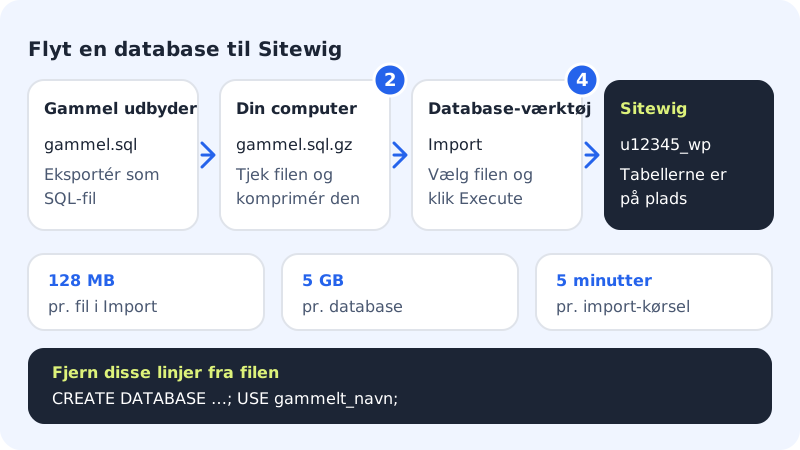
Before you start
- You have an SQL file from your old provider, e.g.
old.sqlorold.sql.gz. It is typically created with phpMyAdmin or a similar tool under Export. - The file is at most 128 MB. If it's bigger, compress it (see step 2).
- You have a database at Sitewig that can be overwritten, preferably a brand-new, empty one.
Import limits
- File size per upload
- 128 MB (a compressed file counts by its compressed size)
- Time per import
- Up to 5 minutes
- Size per database
- At most 5 GB
- Character set in new databases
utf8mb4/utf8mb4_unicode_ci
Import the file
Step 1: Create an empty database
Go to Web hosting → Databases, click Create database and give it a name, e.g.
wp. Save the username and password shown afterwards – you'll need them both in Database tool and on your website. See How to create a database.Step 2: Check and compress the SQL file
Open the file in a text editor and search for lines that begin with
CREATE DATABASEorUSE. Delete them. Your database user only has access to its own database and isn't allowed to create or switch to others, so those lines make the import stop.If the file is large, pack it as
.sql.gz(gzip). An SQL file is often only a tenth of the size when compressed.Step 3: Open Database tool
Go to Database tool (shortcut on the front page of the control panel) and click Open next to the new database. Enter the password and click Login.
Step 4: Choose Import and start
Click Import in the menu. Choose your file under File upload and click Execute. Leave the tab open until it says how many queries have been run.
Step 5: Check the tables
Check the list of tables on the left. For WordPress you should see e.g.
wp_posts,wp_optionsandwp_users(the prefix may be different fromwp_).Step 6: Fix your website's connection
Your website now needs to use the new database. For WordPress, you edit
DB_NAME,DB_USER,DB_PASSWORDandDB_HOSTinwp-config.php. The host is alwayslocalhost. See Find the host name, port and username.
If the import fails
| Error message (in Database tool) | What it means | How to fix it |
|---|---|---|
Access denied for user … to database … | The file is trying to create or use another database | Delete the CREATE DATABASE and USE … lines in the file |
| Unable to upload a file or Too big POST data | The file is over 128 MB | Compress to .sql.gz, or split the file into several smaller ones |
| The page stops or times out | The import takes more than 5 minutes | Split the file, e.g. one file per large table |
| Table … already exists | The database isn't empty | Use a new, empty database, or delete the tables first |
| Strange characters such as æ instead of æ | Wrong character set in the export | Export again with the utf8mb4 character set at your old provider |
Frequently asked questions
Can I import a file that is larger than 128 MB?
Not in one piece in the browser. Compress the file, or split it into several files and import them one at a time. If that isn't possible, contact support and we'll find a solution together with you.
Can I import from the command line over SSH?
We can't promise that yet. SSH is available on the web hosting, but we haven't documented importing with command-line tools from there. Use Database tool, or contact support for very large databases.
Does the database have to have the same name as at my old provider?
No. The database name isn't stored in the tables themselves. You just need to enter the new name, e.g. u12345_wp, in your website's configuration.
Does this also move my WordPress files?
No, an SQL file only contains the database. Images, themes and plugins are in the wp-content folder, which you move with the File manager or SFTP.