When you change name servers, it is Sitewig's DNS that answers for your domain. Records you made yourself with the old provider (for example a Google verification, a subdomain for an external service or a CNAME for your newsletter) must therefore also exist at Sitewig before the change. Otherwise they stop working.
You have three ways to bring them along.
1. Records to bring along (in the moving guide)
In step 5 of Domains → Move here, the guide shows the records it has found in the old DNS under Records to bring along. Tap Add at Sitewig next to each one. This is the easiest way, but the guide can only see records it can look up from the outside, such as well-known verifications.
2. Import the whole zone
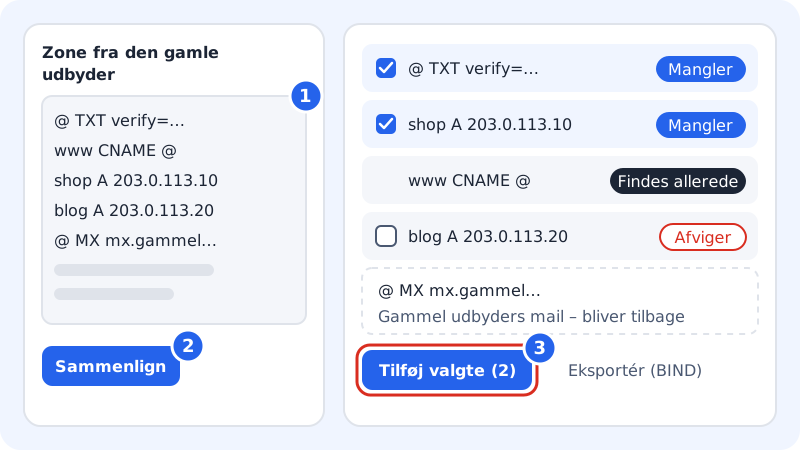
The Import DNS from your old provider card on the domain's page compares the whole old zone with your zone at Sitewig, so that nothing is forgotten.
Step 1: Get the zone from the old provider
Many providers can export DNS as a zone file (BIND format). Otherwise you can copy the table from their DNS page.
Step 2: Open the card on the domain's page
Go to Domains → My domains, and choose the domain. Tap Import DNS in the Import DNS from your old provider card.
Step 3: Paste or upload the zone
Paste the text into Zone from the old provider, or tap Upload file. Under Format you can leave Detect automatically selected, or choose BIND zone file, Table (tab or semicolon), CSV or JSON.
Step 4: Tap Compare
Each record gets a status. The records that typically need to come along are selected in advance. Only records with the status Missing or Differs can be selected.
Step 5: Add the selected ones
Check the list, and tap Add selected. The number on the button shows how many records will be added.
Step 6: Save a copy
Tap Export zone (BIND) to download your new zone as a file. That gives you a backup.
What do the statuses mean?
- Missing
- Does not exist at Sitewig, typically needs to be added
- Already exists
- Is already in your zone at Sitewig
- Differs
- Exists with a different value – if you add it, it replaces your current value
- Conflict
- Clashes with another record or with Sitewig's default setup
- Invalid
- Could not be read
Records that belong to the old provider's email (for example their MX, SPF and DKIM) are marked stays behind or Made by Sitewig. You should not add those. Lines such as SOA, the domain's own NS records and DNSSEC records are also skipped, because Sitewig's name servers create them themselves.
3. Add records by hand
If you only have a couple of records, you can create them directly in the DNS section on the domain's page with Add record. See Add, edit and delete DNS records.
Frequently asked questions
Should I bring MX records along?
No, not if your email is going to be with Sitewig. Sitewig creates MX, SPF, DKIM and DMARC for its mail server itself.
Can I import the zone after the name server change?
Yes, but then your own records will have been missing in the meantime. It is best to do it beforehand.
What about DNSSEC?
If DNSSEC is switched on with the old provider, the import warns you. Switch it off there, and wait until it has gone before you change name servers.